 | ||
|
||


|
|||||||


| Mod / System Gallery You got your machine all Spiffy'd up? Got the Chrome and the Fuzzy Dice? Show em off! (Free Image Hosting) |
 |
| Thread Tools |

 11-27-2005, 01:25 AM
|
#1 |
|
Cooling Neophyte
Join Date: Mar 2004
Location: INdiana
Posts: 23
|
Scope: To created an external enclosure for my watercooling parts.
Design: A square base made of aluminum angles, with an aluminum plate for the floor. Use clear acrylic for the walls and Lid (fasten lif with hinges). Parts: Voyeurmods quad 120mm heatercore Swiftech MCP-655 Pump (liang brand) Typhoon 120mm Reservoir in UV blue Fortron Mini PSU 200watt (to power fans lights and pump) Sleeving in UV blue Hydrx UV green coolant Misc Hardware from MCMaster-carr (edge molding, Rubber foam padding, clamps etc...) 4x Evercool Aluminum 120mmx25mm Fans 79CFM, 12V @ 31dB. On to the pics: Heres my fortron PSU: 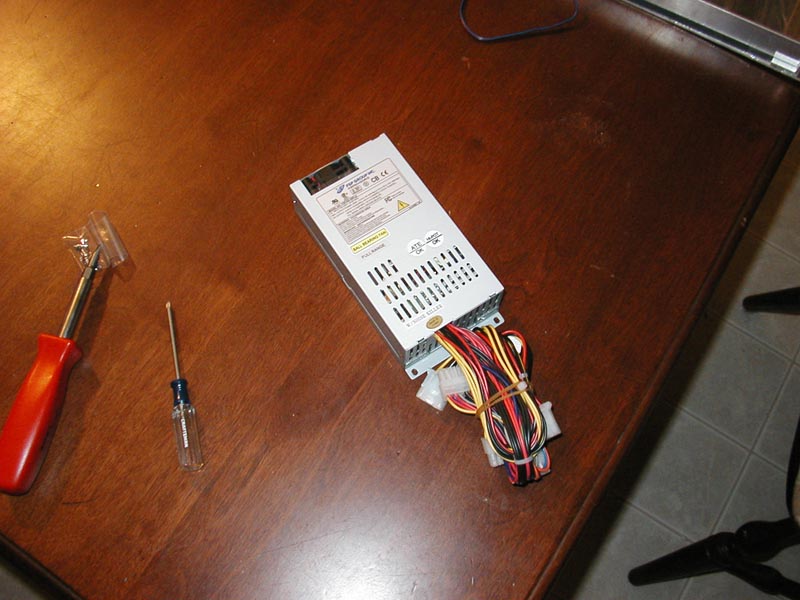 The fan Controller that will power 4 fans and the UV lamps: 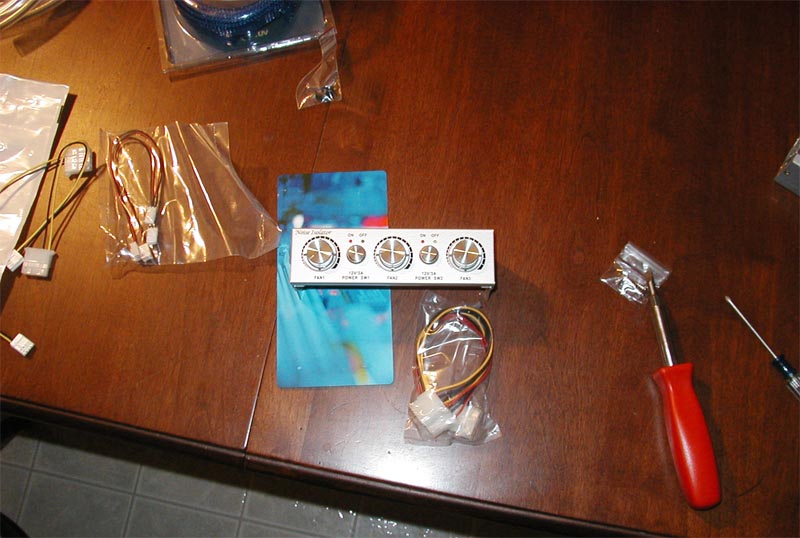 Sleeving some wires in the kitchen:  Quick Mockup: 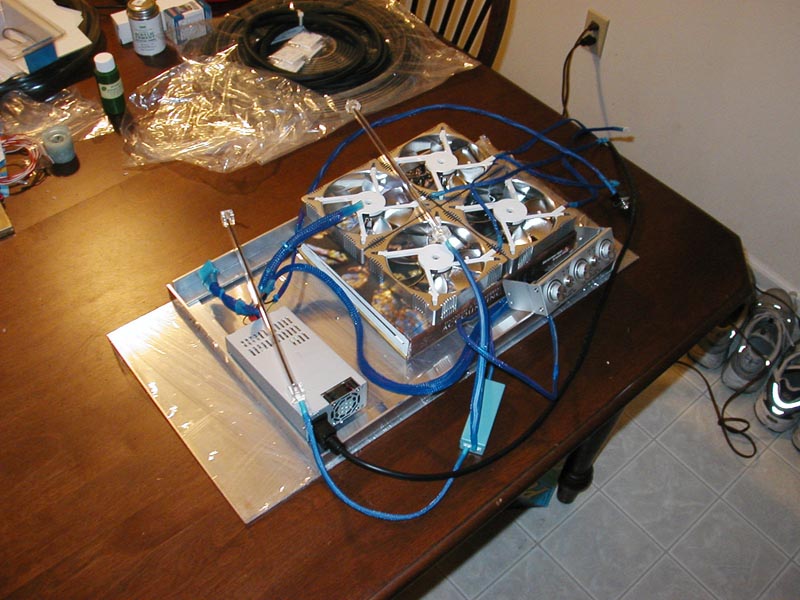 Mockup with the UV lamps going ,tad blurry...:  To the garage! Space heater to keep em warm in the 20 degrees, right next to my 2004 Lightning: 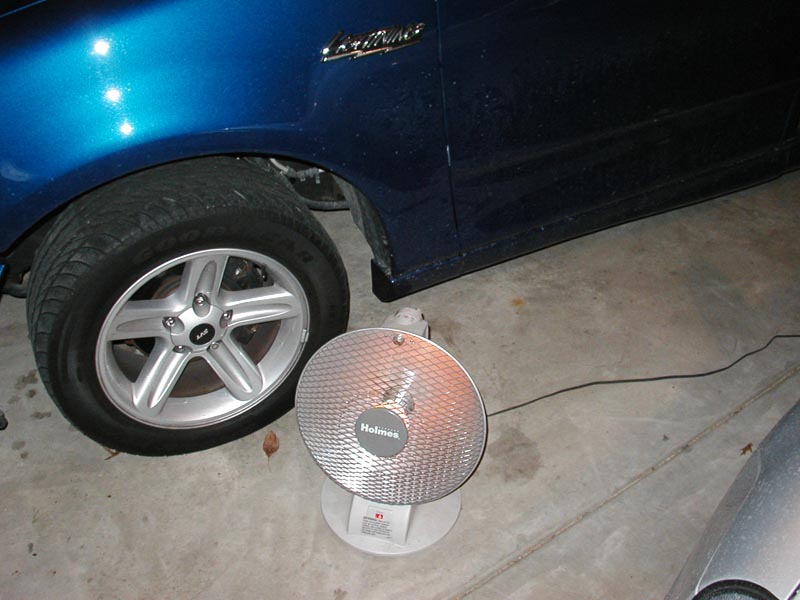 Get another mockup going after I get my aluminum plate cut: 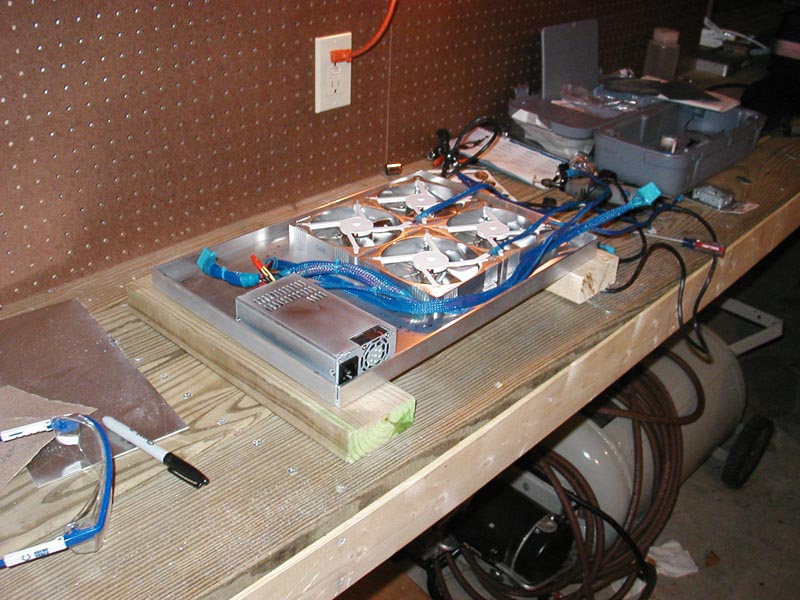 Drilling the Angles in prep for secureing the base together: 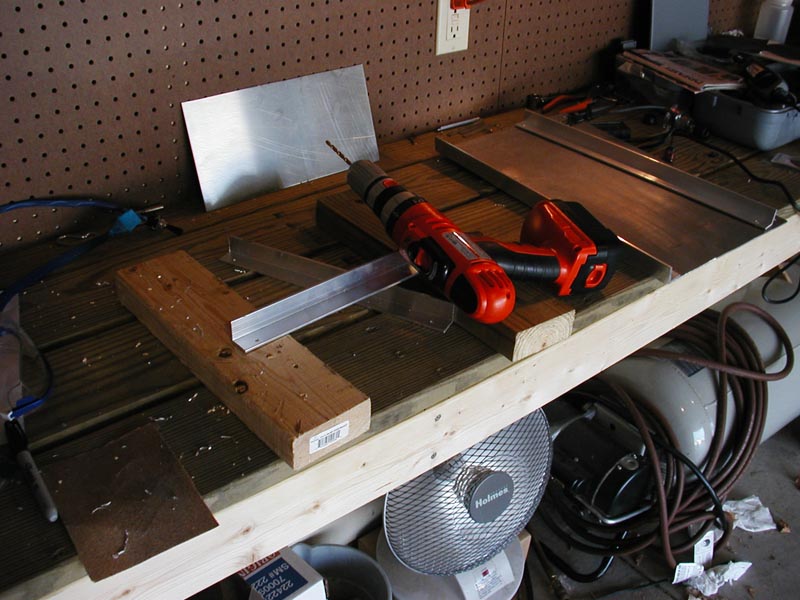 Got the base completed with the first bolts holding it together: 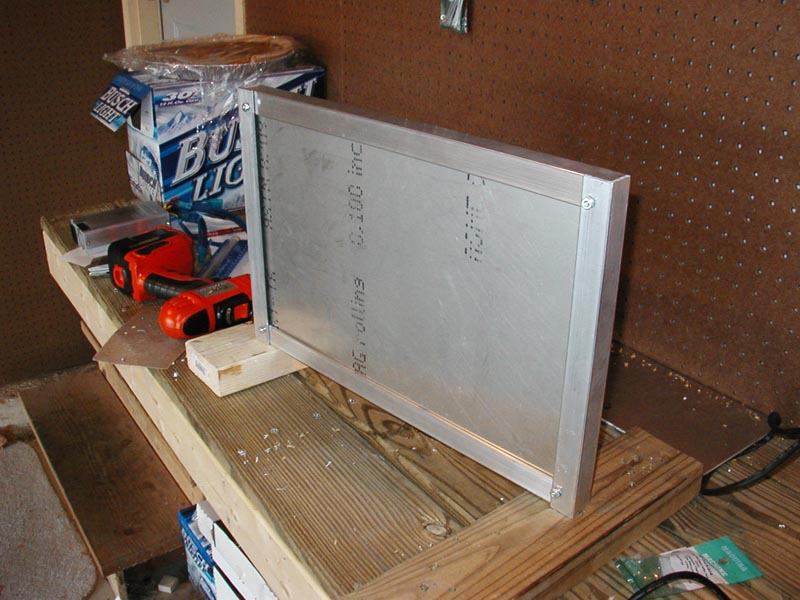 Radiator and shroud out! the thing is huge! but lighter than I thought. Voyuermods.com had sucked packaging, they didn't even tape off the barbs on the pump and rad! 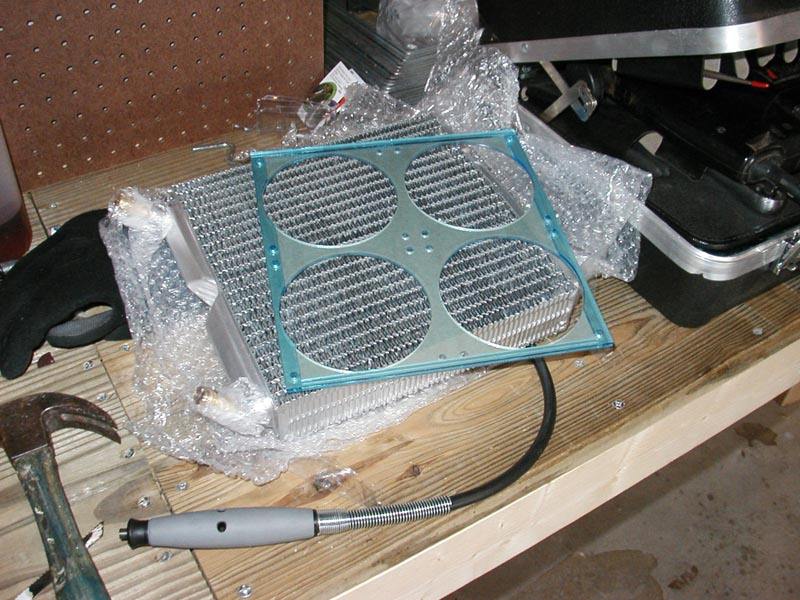 Got the shroud and fans mounted with some of that rubber foam to provide more of a height to the shroud and air insulation: 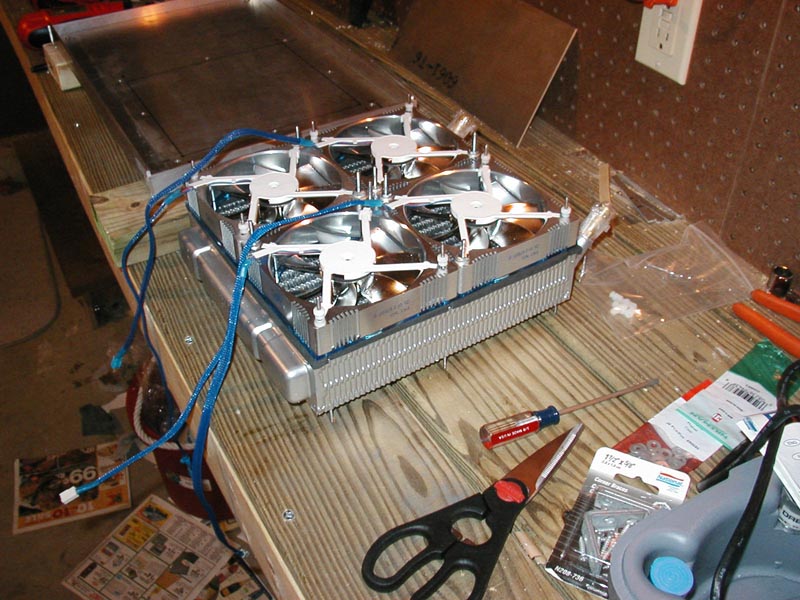 Got the parts in the base in another mockup of their placement: 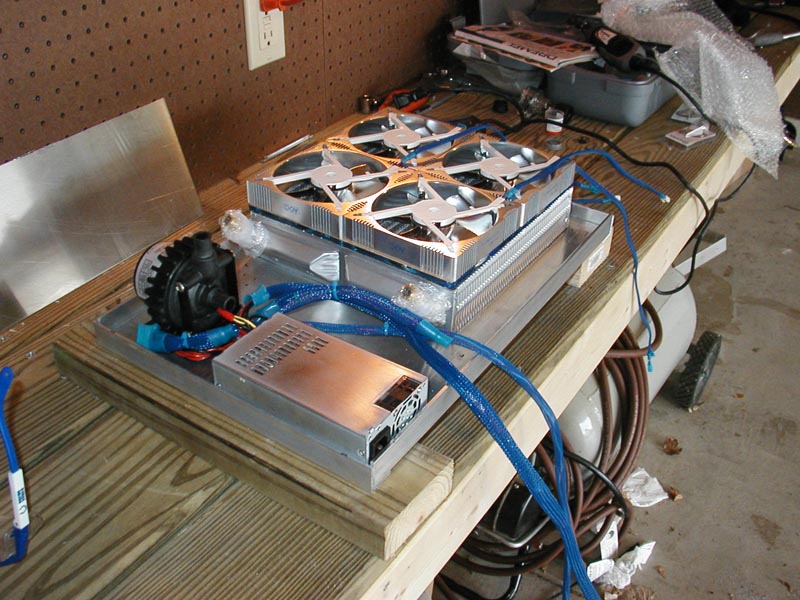 Starting to drill and cutout the damned 1/8" plate with a drill and jigsaw. Let me tell you it is a pain i nthe ass with a hand held jigsaw cutting through 1/8" alunum plate, go 1/16" if you want to acomplish the same thing:  Thats all for now. I'll be getting my acrylic in on monday (todays sat). Sunday I'll finnish cutting the base plate and drilling the holes necessary for the pump mounting and psu mounting! Maybe think of how I'll make some feet on this thing. I'm not sure how I'll make vents for the air to come in/out through the inside/top of the enclosure yet... but the fans wil lbe sucking air in through the bottom. Questions, comments? log into my forums and ask away, no email authorization registration required: http://forums.unoid.net/
__________________
http://unoid.net |

|

|
|
11-27-2005, 03:14 AM
|
#2 |
|
Cooling Neophyte
Join Date: Mar 2004
Location: INdiana
Posts: 23
|
Couple additions, Couldn't sleep, so I decided to waste 1.5ft of tubing and some 70% isopropyl alcohol and distilled water to flush the rad and pump out and test the res for leaks.
Here ya go: 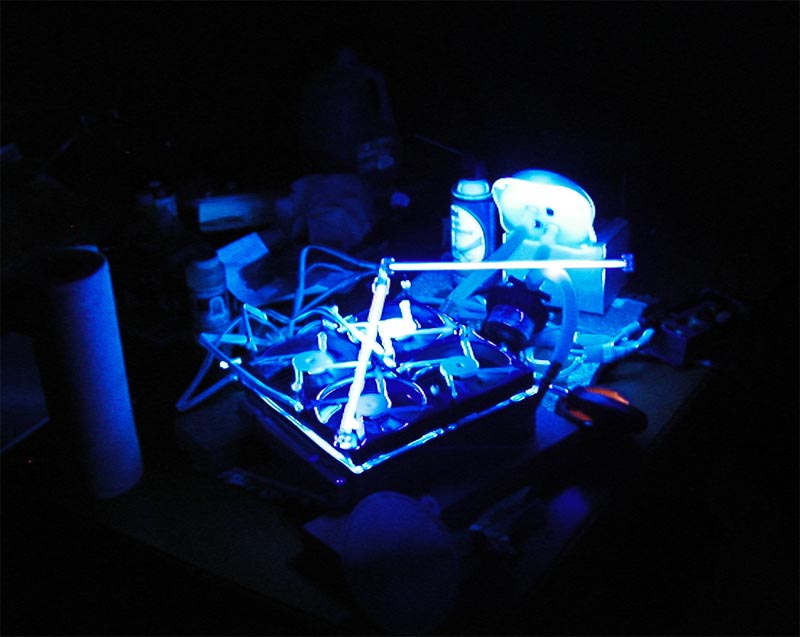 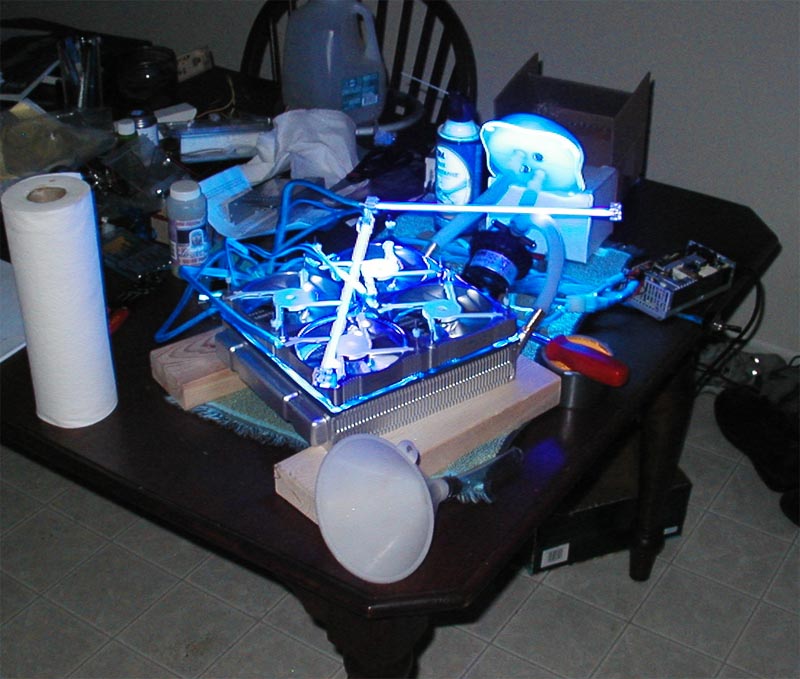 Those fans sure do pull some nice air through the bottom of the radiator. They're also kinda loud at 12V. but near silent when the fan contorller pus them all the way to low, 5-7V.
__________________
http://unoid.net |
|
|
|
|
11-27-2005, 04:18 PM
|
#3 |
|
Cooling Neophyte
Join Date: Mar 2004
Location: INdiana
Posts: 23
|
I pretty much got the entire base and mounting done for my project. All that really is left is working with the
acrylic and mounting the reservoir and fan contorller and power switch. I should get the acrylic work done by tuesday or wednesday. On to the pics! I got the plate cutout done and mounted the rad up to check bolt alignment: 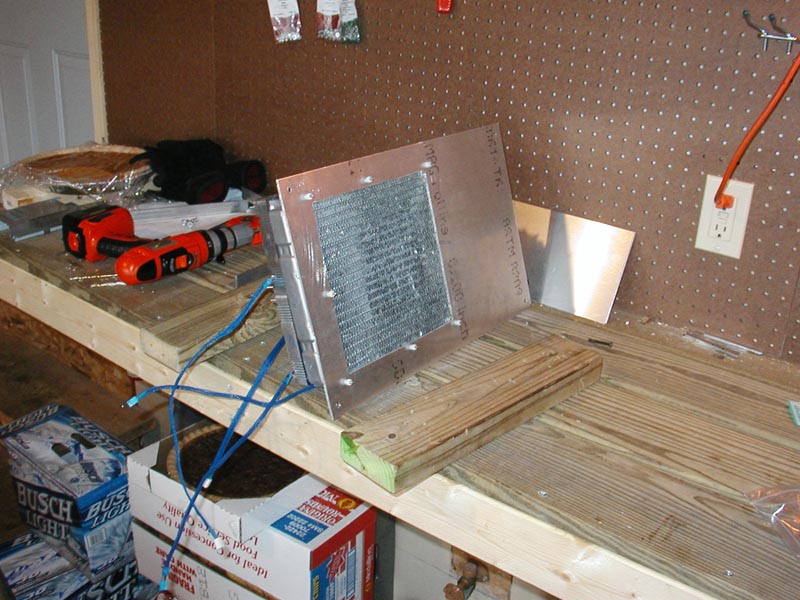 I used a steel wire attachment on my dremel to get a brushed aluminum look: 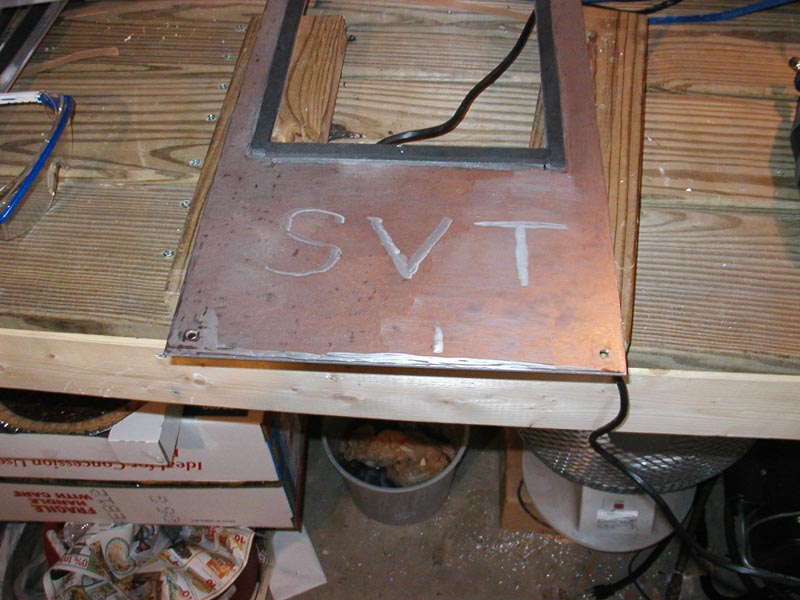 A finished brushed look with some SVt logo for fun  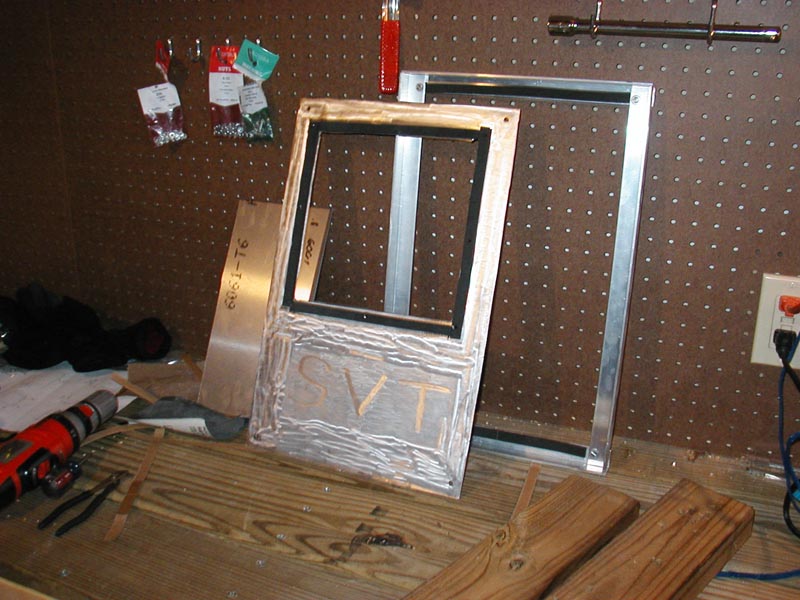 Got the whole base bolted together and brushed the visible sides of the angle aluminum: 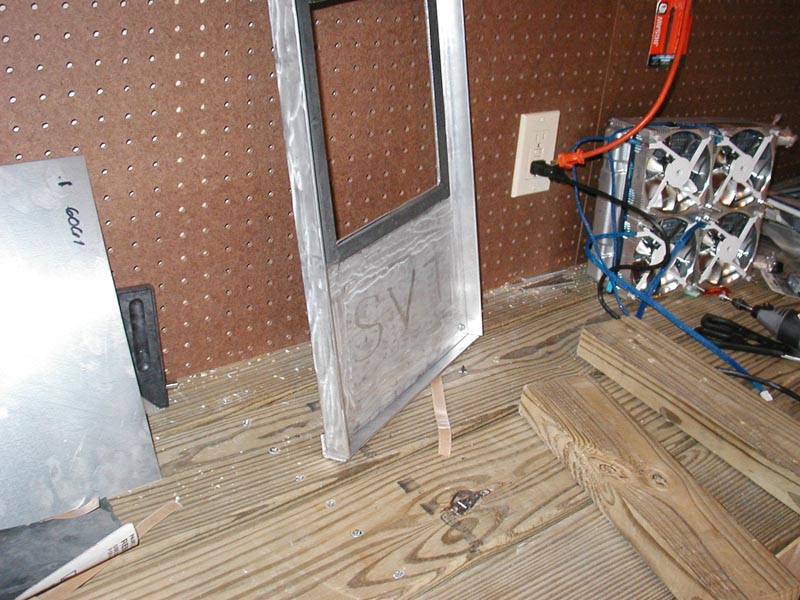 I had to come up wit some way to mount the psu so the fan can have a vent hole in the acrylic and a hole for the power cable: 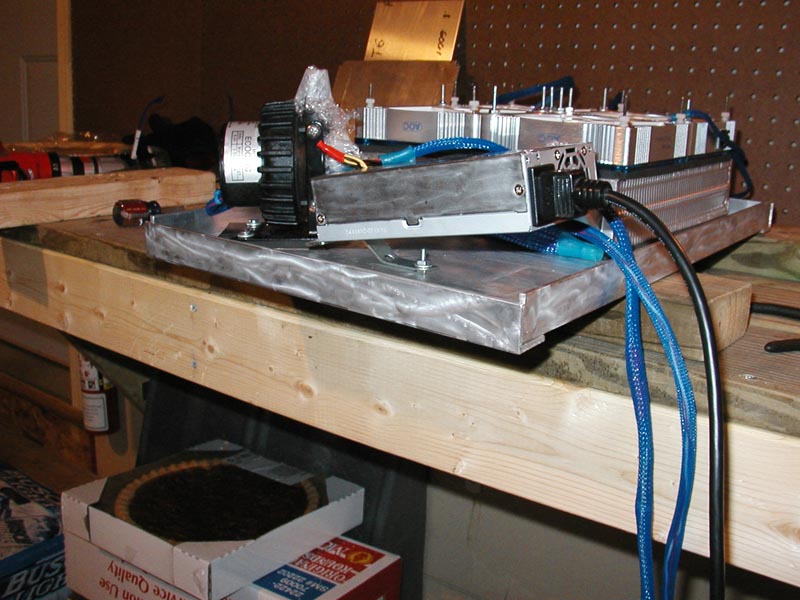 Now I have everything mounted!  Heres a quick mockup with proper fan controller and res placement:  Another but with dark shot to show the UV fun! 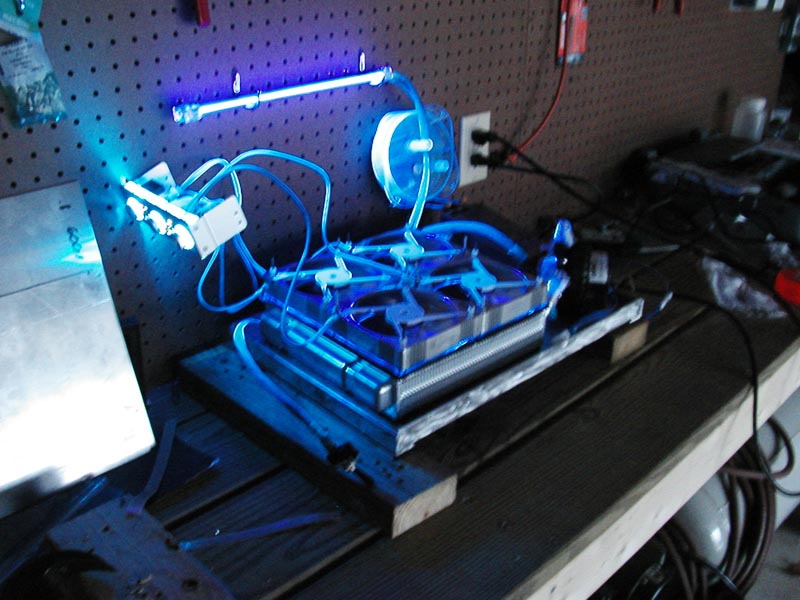 I'll post again in a couple days when I get to working with my acrylic!
__________________
http://unoid.net |
|
|
|
|
11-27-2005, 04:24 PM
|
#4 |
|
The Pro/Life Support System

Join Date: Dec 1999
Location: Denver, CO
Posts: 4,041
|
being an owner of an SVT focus, I like the SVT logo
__________________
Joe - I only take this hat off for one thing... ProCooling archive curator and dusty skeleton. |
|
|
|
|
11-27-2005, 05:29 PM
|
#5 |
|
Cooling Neophyte
Join Date: Jun 2005
Location: New Jersey
Posts: 38
|
Were'd you get the psu?
|
|
|
|
|
11-27-2005, 06:02 PM
|
#6 |
|
Cooling Neophyte
Join Date: Mar 2004
Location: INdiana
Posts: 23
|
lota ppl have asked about the psu, I just looked for a small psu like in those shuttle barbones...
I bought this one: http://www.directron.com/fsp20050pla2.html |
|
|
|
|
11-30-2005, 08:58 PM
|
#7 |
|
Cooling Neophyte
Join Date: Mar 2004
Location: INdiana
Posts: 23
|
I got to working with the acrylic. I cut the acrylic with a skillsaw with a
plastic/metal blade with many many teeth. My cuts were perfect however... I should ahve gone to lowes and paid them to laser cut everything for me. If you are gonna work with acrylic make sure to have it laser cut, it'll save you time and it'll look better! Pics: Got the acrylic panels mocked up on the box 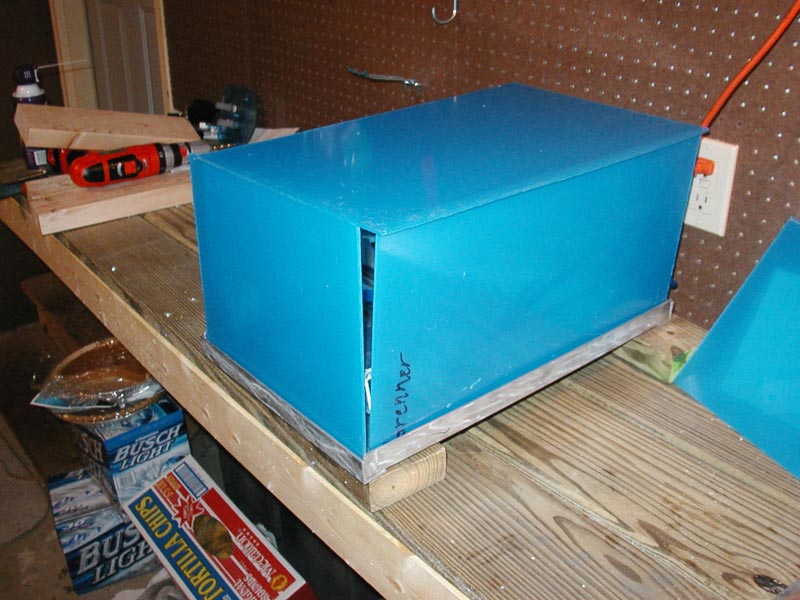 Getting ready to cut out the power supply hole for cable + fan exhaust: 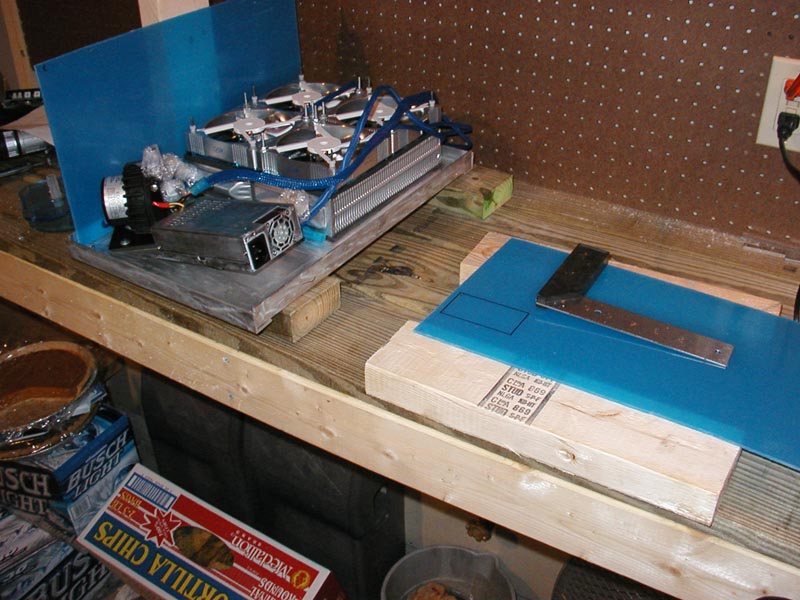 Here I'm mounting and cutting out the holes for my res: 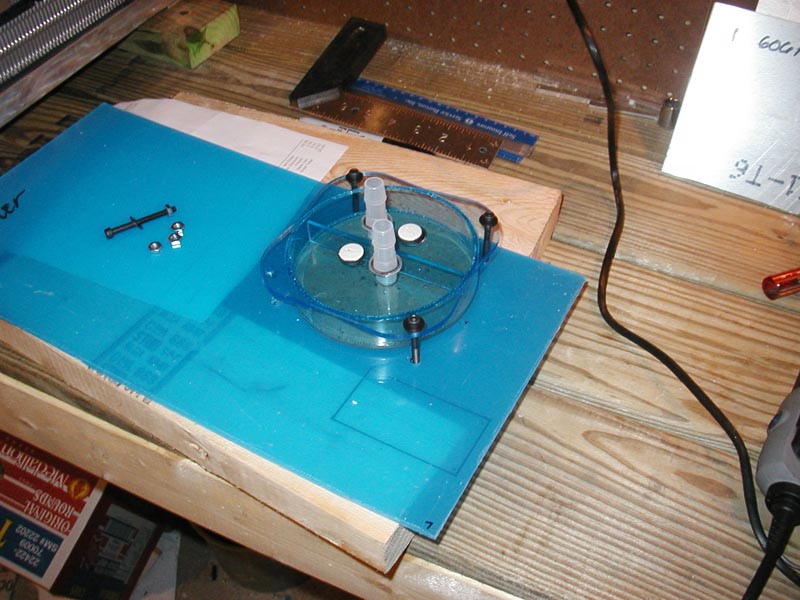 Dremel cutting (wasn't fun at all!) 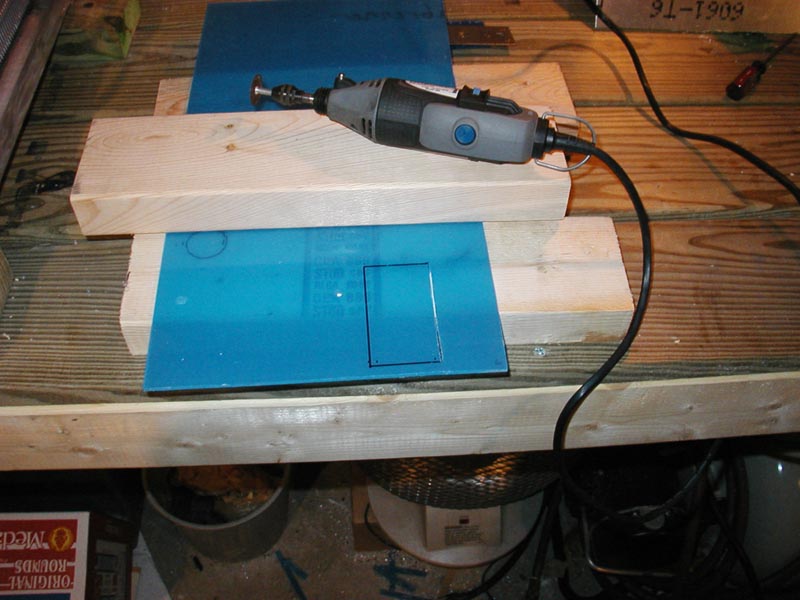 Drill bit to cut the hole which will house the on and off power sitch (green and ground from motherboard 20pin connector: 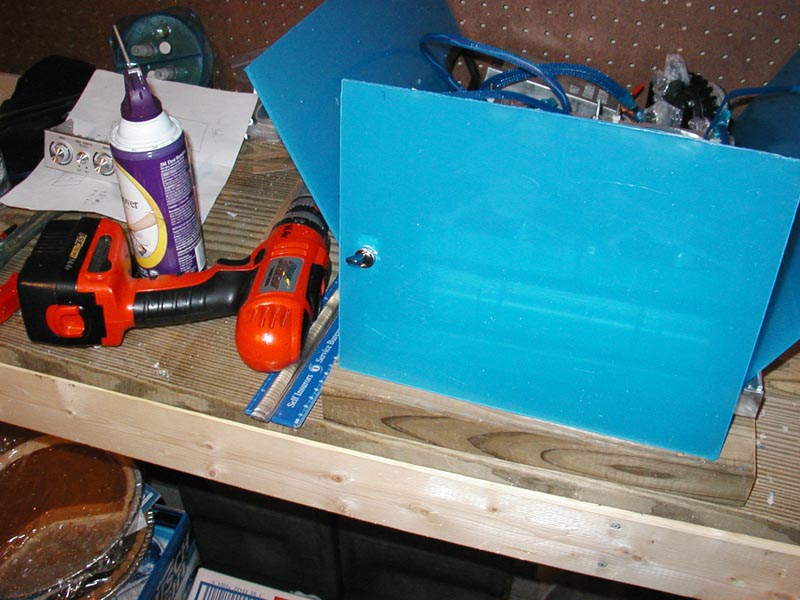 ANother mockup: 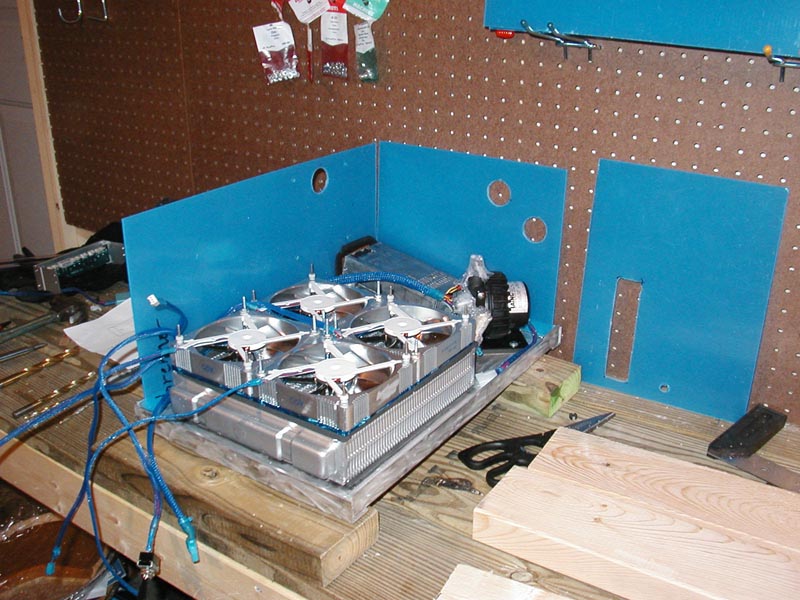 Lid design for air exhaust: I was at a loss on how to do an exhaust for this bad boy, thought about it for a good 30 minutes... So I said F-it and did some crap design: 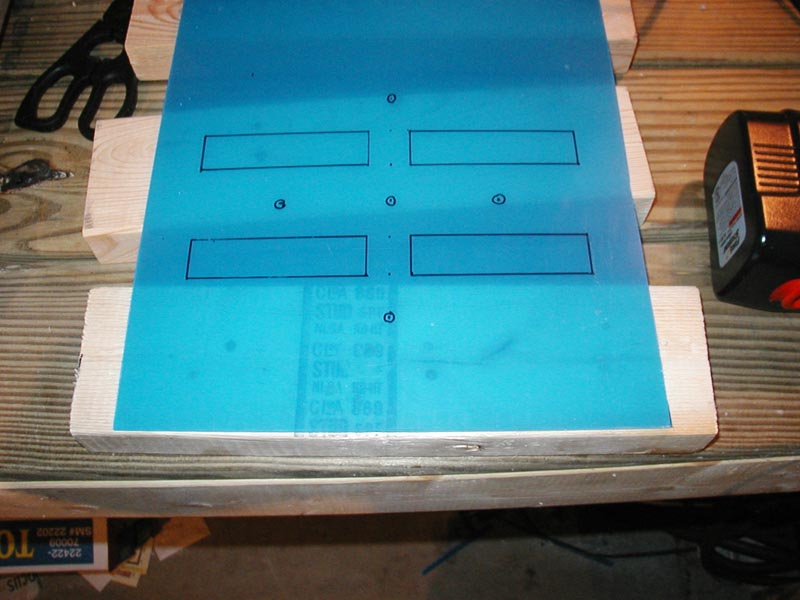 Cutting out the design: As you can tell I got rid of the top and bottom holes because when I was drilling with my wood bits(should bought acrylic bits) I ended up making small cracks in the acrylic.. so quick fix, change design: 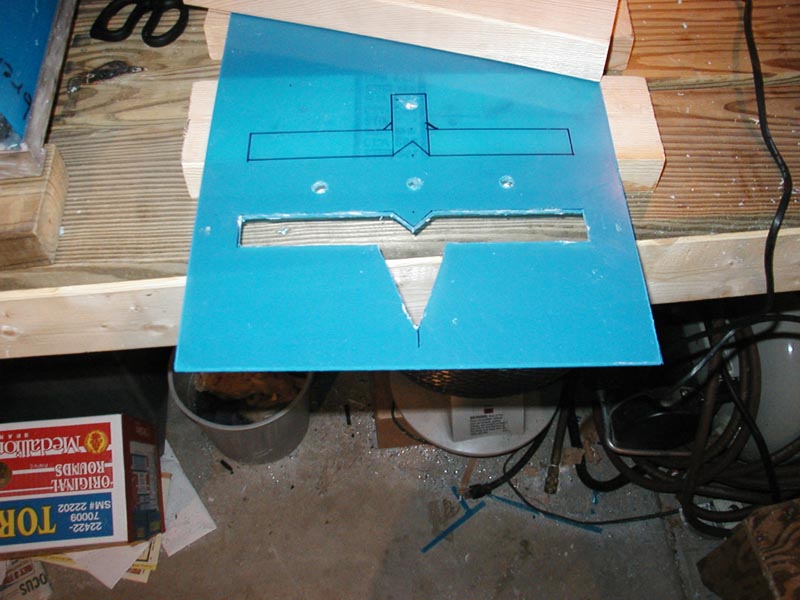 Finnished the lame ass design: 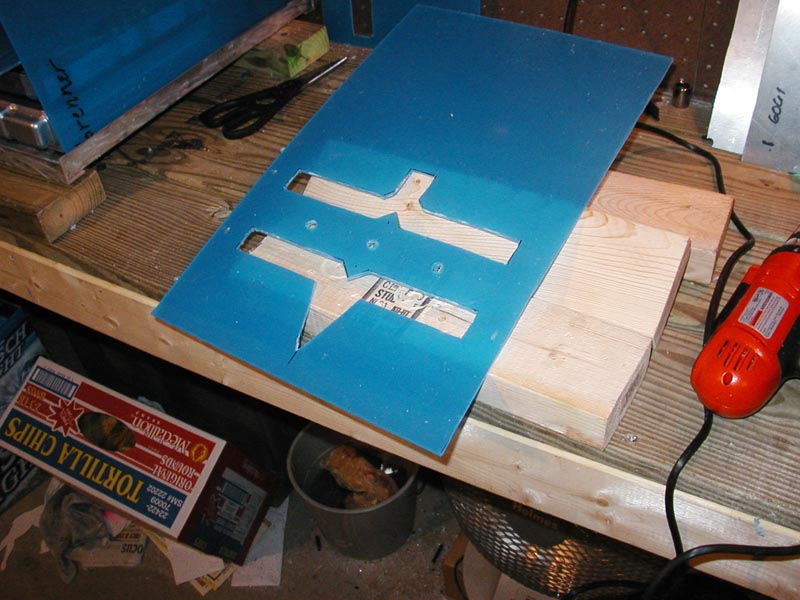 Started acrylic cementing, but I screwed up plus the cement wasn't holding good enough 3/16" acrylic is a tad thick to cement at its edges: 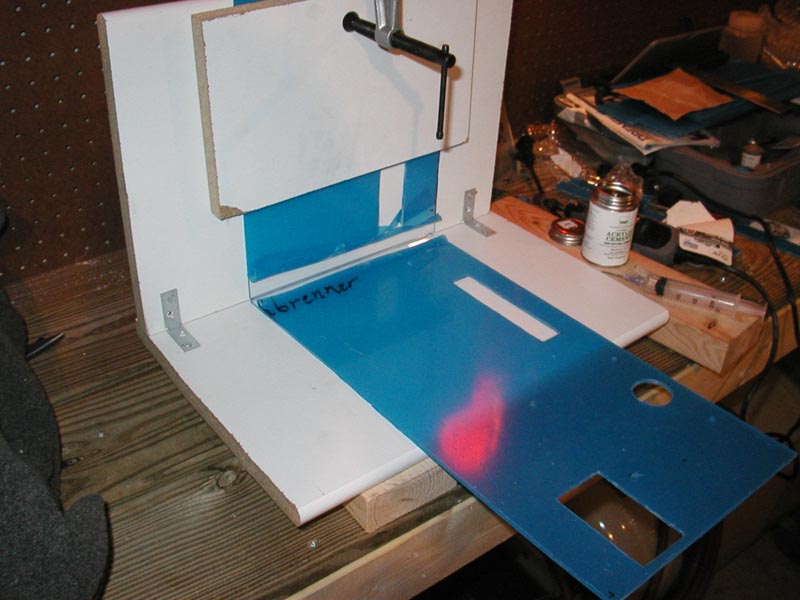 Soo! I went to lowes and picked up some hardware for the feet (fat hexbolts and capped nuts which will rest the base 1.5" off the ground. and I decided I'd just bolts the acrylic walls together with angle pieces: 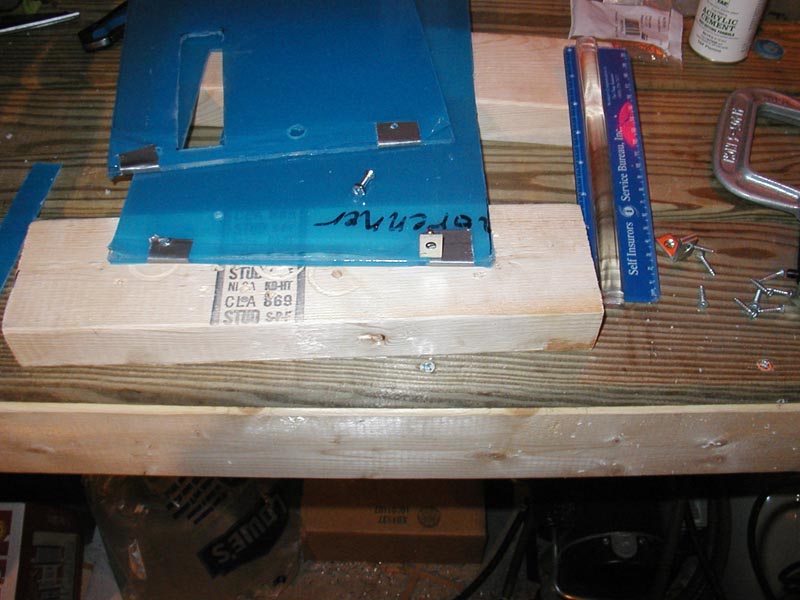 One corner finnished: 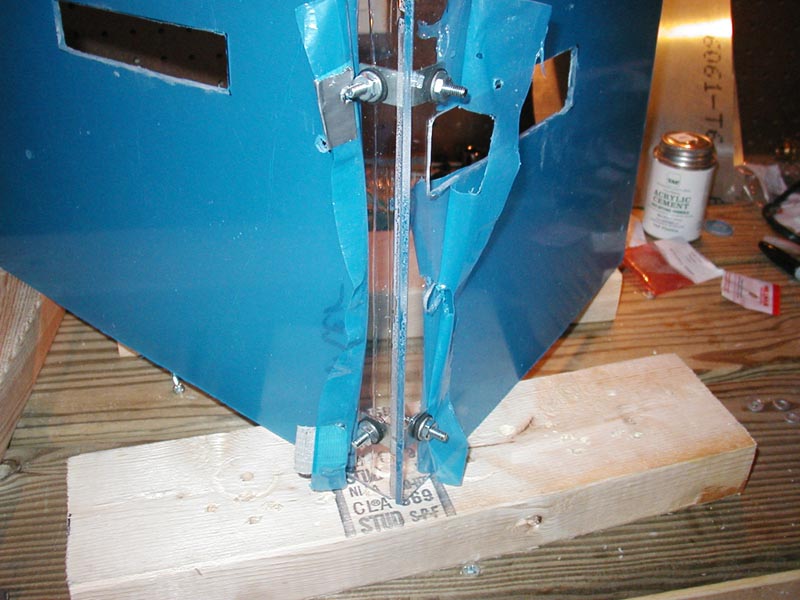 all 4 finnished: Doens't look as bad as I thought. I kinda like the bolty look:  Mocking the lid up top:  so... Now I'm cementing the 4 joints again while its all bolted up to make the edges look a bit smoother and add more strength... Next up I need to use my acrlic hinges and cemeent them to the lid and well then add the feet and do some finnish sanding and I'll be done! stay tuned...
__________________
http://unoid.net |
|
|
|
|
12-01-2005, 10:38 PM
|
#8 |
|
Cooling Neophyte
Join Date: Mar 2004
Location: INdiana
Posts: 23
|
Finally got all the acrylic and mounting finnished! Lets see the pics!
Here are my feet for this box of lubbin, 5/16 2" bolts with 4 nuts and 4 endcap nuts: 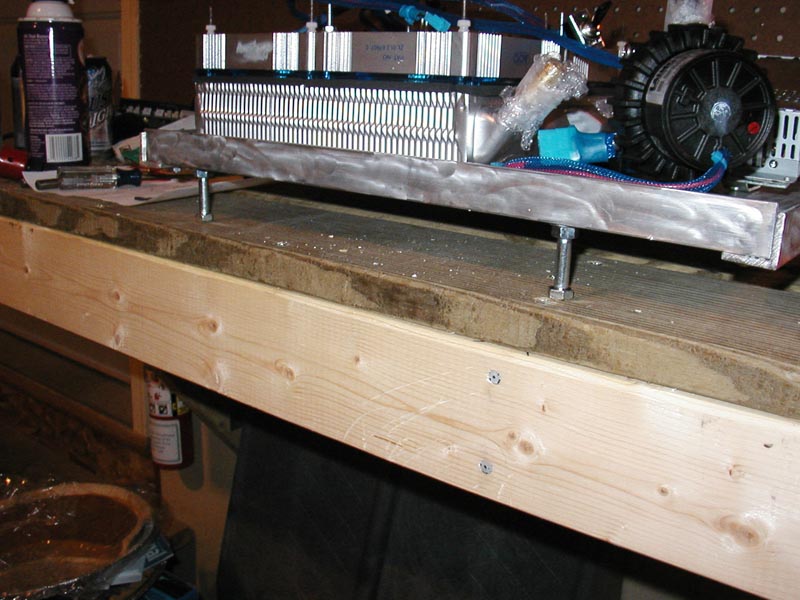 Top view of the feet: 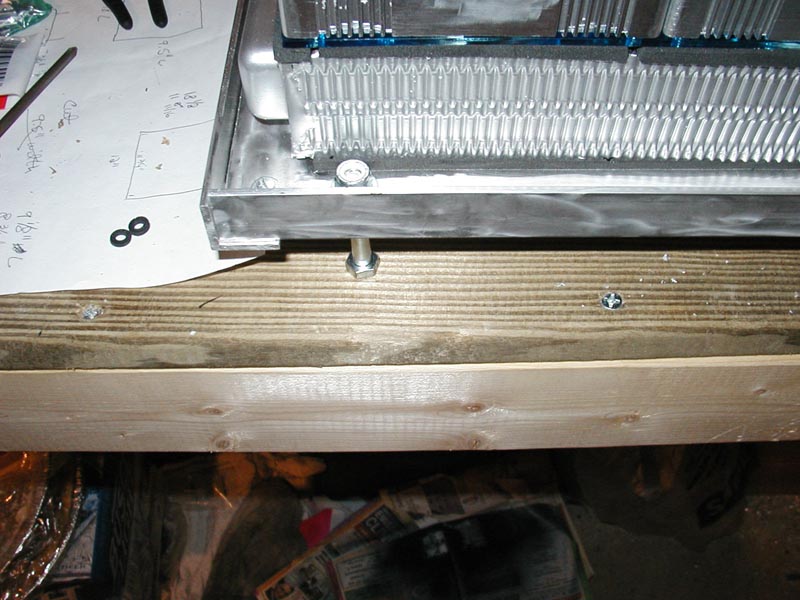 Peeling off the protectant film! 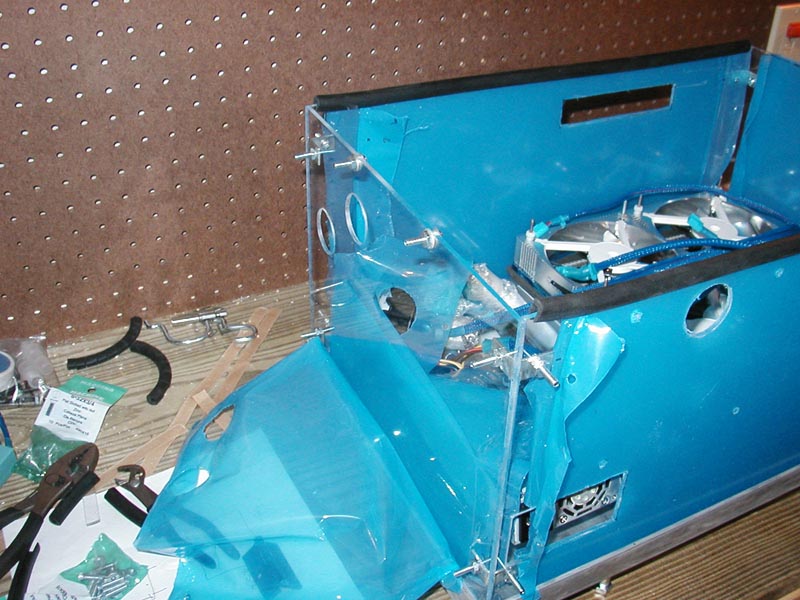 Wow it looks a lot better and my cuts don't look as horrible anymore: 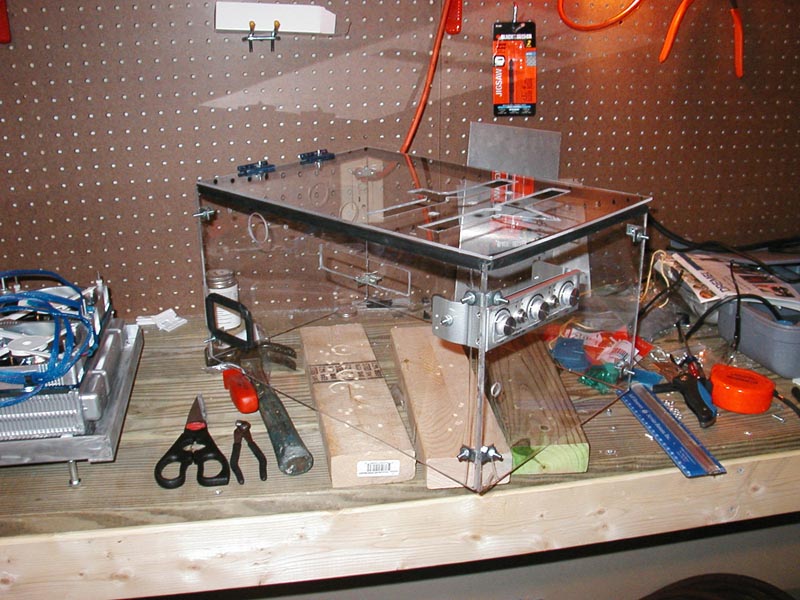 Get some rubber molding put on: 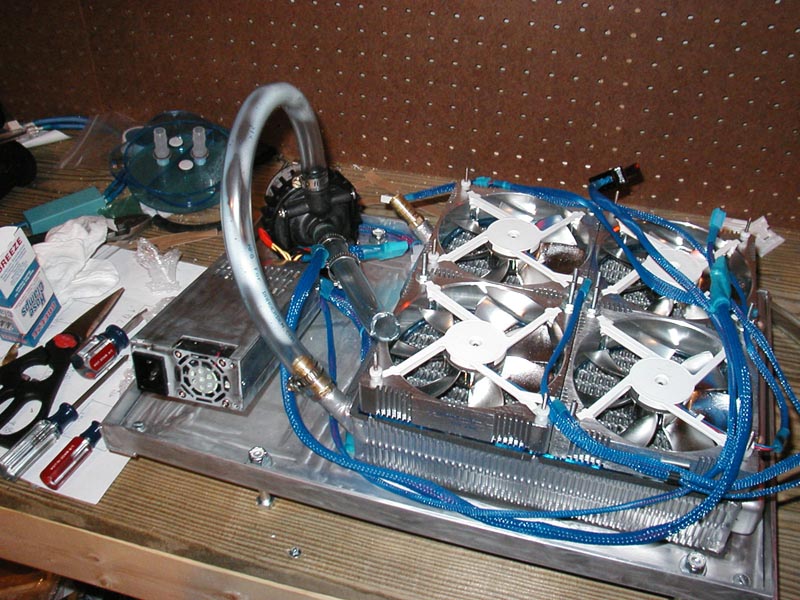 Start to mount the tubing! 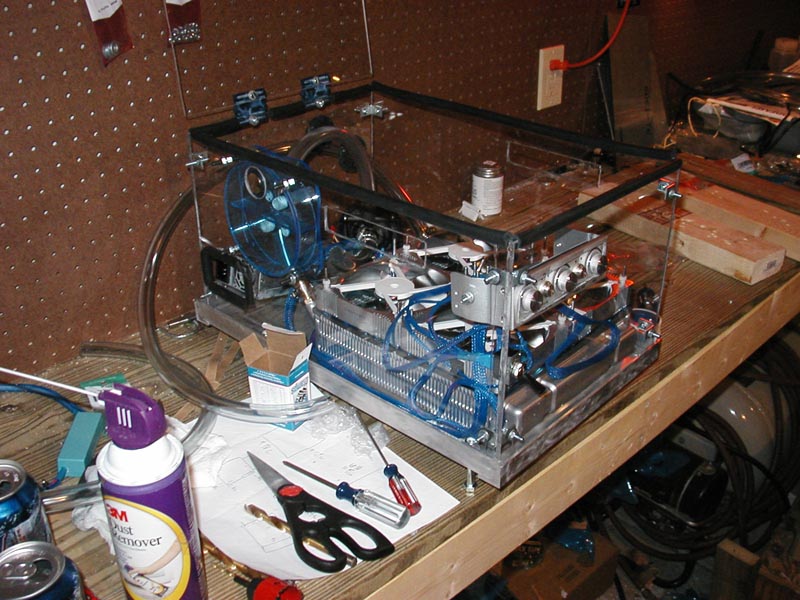 Finnished with the tubing and not I can mount the res, power switch, fanbus: 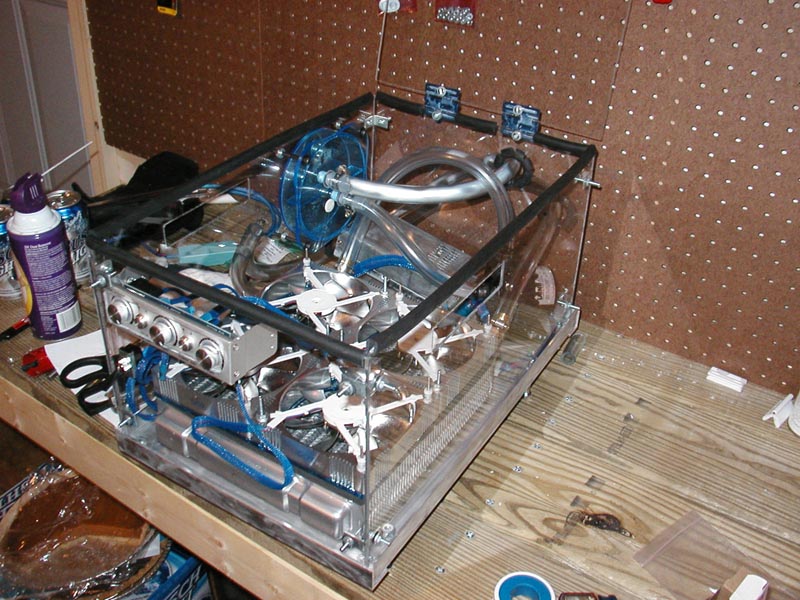 All done! Night shot with UV turned on: One note: the coolant will be UV green so imagine UV green inside the tubing and res: 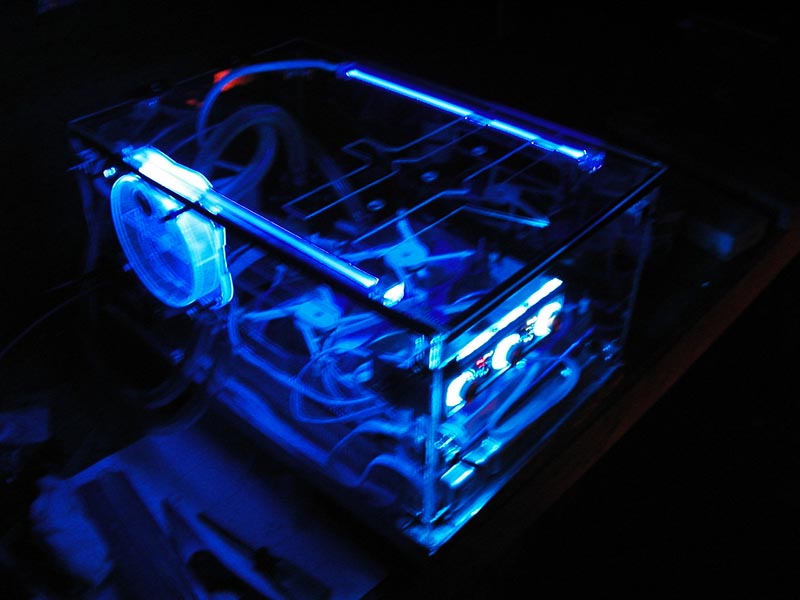 Different flash: 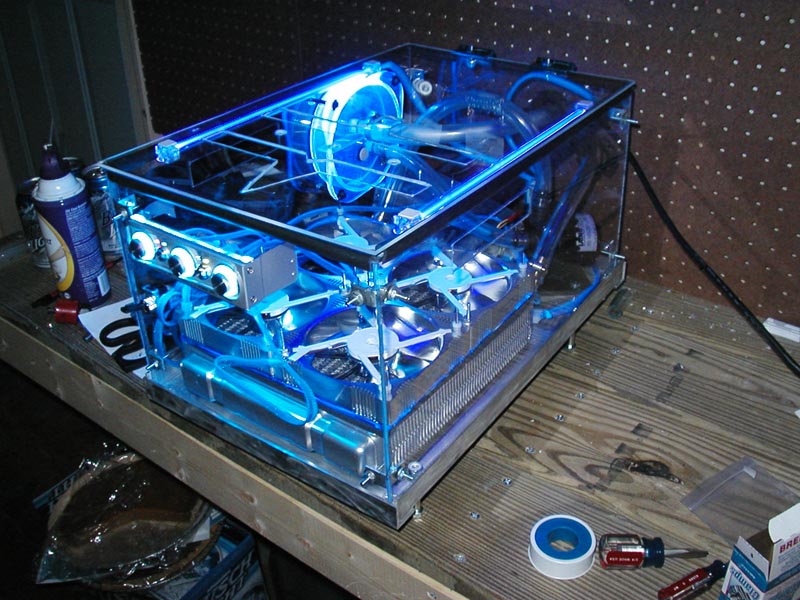 Got it cleaned up and inside for some final shots: 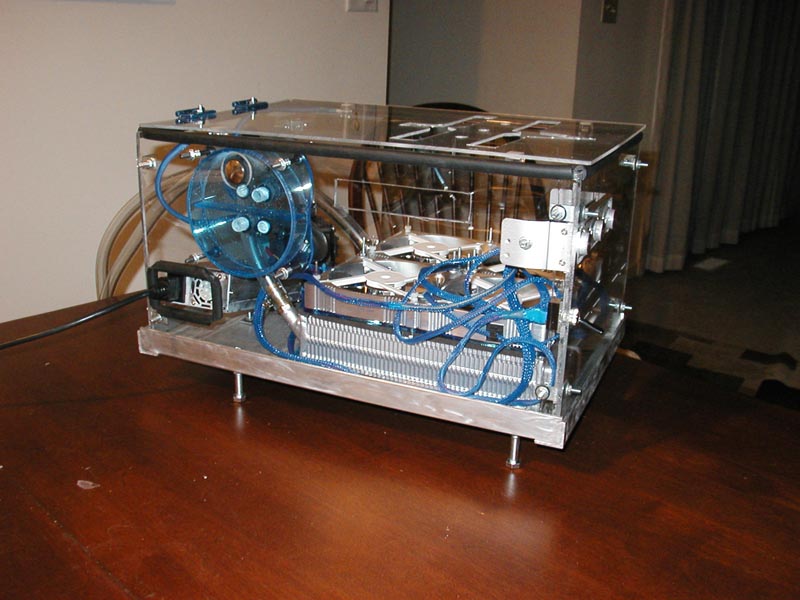 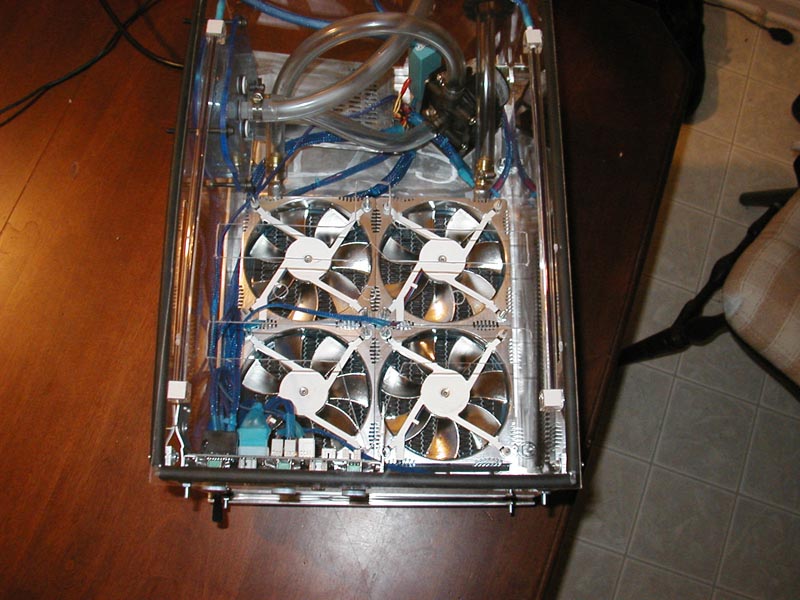 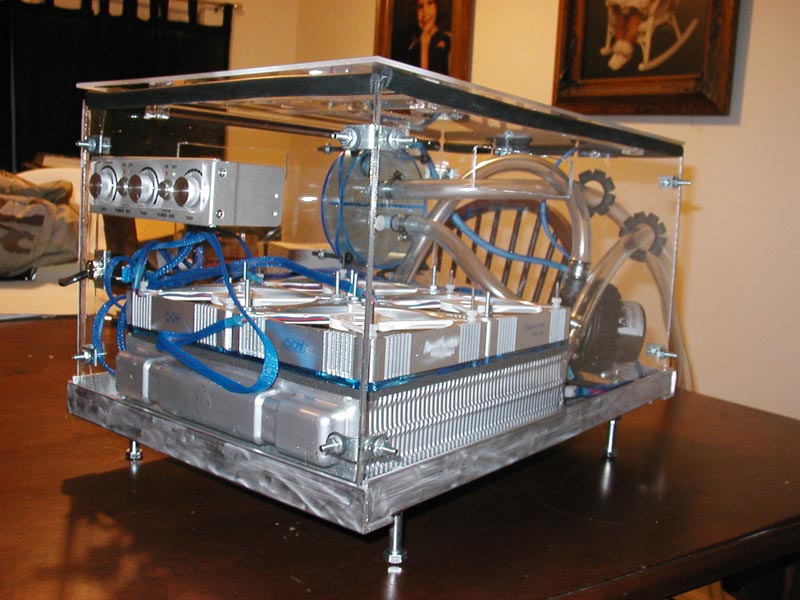 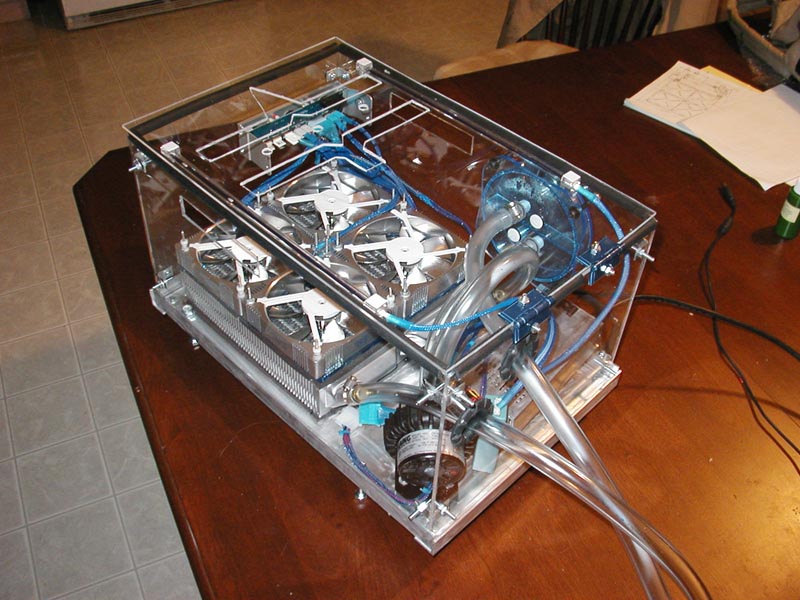 I haven't done anything that secures the acrylic to the base yet, I don't think i'll really have to either. I'm unsure as to when i'll hook this bad boy up to my current rig to get some cooling results. But I will soon and update this log with the results. Doesn't look half bad for a 350$ box?
__________________
http://unoid.net |
|
|
|
|
12-02-2005, 03:38 AM
|
#9 |
|
Cooling Neophyte
Join Date: Mar 2004
Location: INdiana
Posts: 23
|
Got it hooked up to the rig in my sig (hoping to upgrade in spring for M2 and maybe r600?)
Heres the pics: Attached to my old maze4, I didn't wanna take my mobo off its tray to take the waterblock off and reapply as3 (got tons left still) so I just tightened it a couple turns more and attached the new tubes. 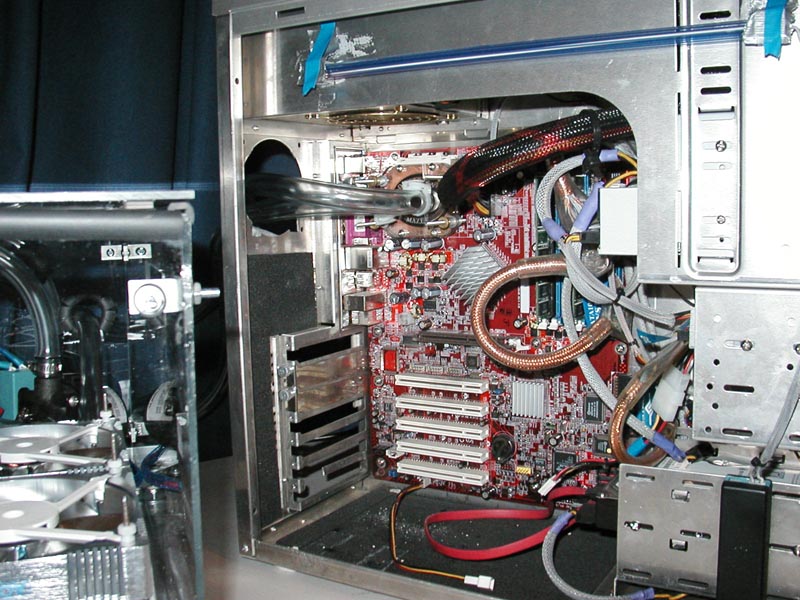 Pic of my desk that will soon break , I'm gonna build myself a new desk with my fathers help soon, very soon: 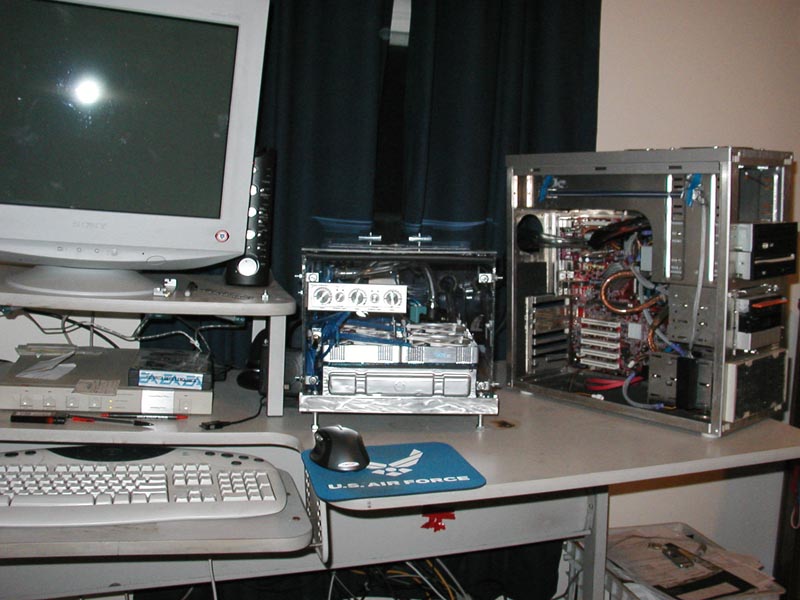 Filling up the system slowly: 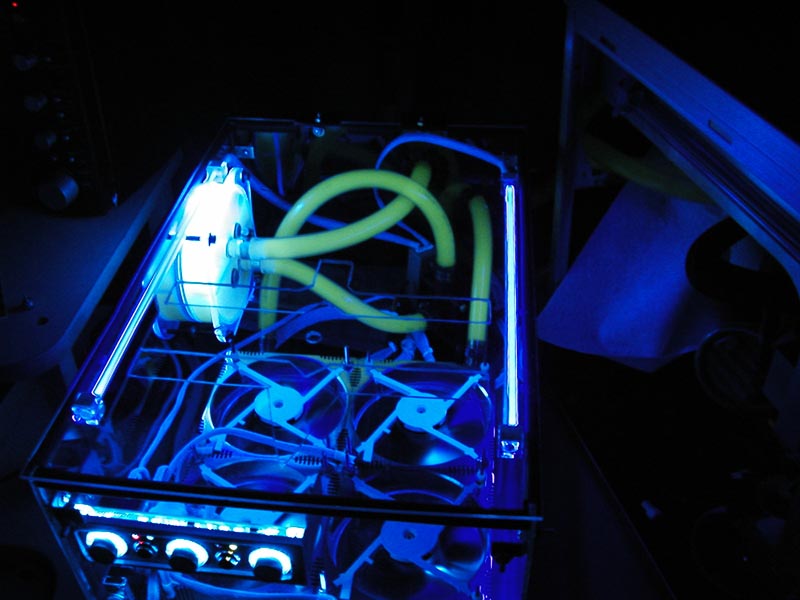 Pretty UV green!  As far as cooling results: WIth my origanal setup of maze4, eheim 1250, and a black ice pro single 120mm: Idle: fan(12v) 39CPU,31case,26.8 Temp Probe (in case) Fan(5V) 43cpu, 32case, 28.5probe Load: Fan 12V: 44cpu, 33case, 28probe Fan 5V: 47cpu, 33case, 28.5probe WIth my new setup: Idle: fan 12V: 31Cpu, 28case, 23 probe Fan 5V: 32cpu, 27case, 23probe Load: Fan 12V: 36Cpu, 28case, 24probe Fan 5v: 37cpu, 28case, 23probe Rundown: so having the fans at low compared to high doens't really affect my cooling performance. It would seem this radiator, no matter the fannage is overkill for one mobile barton running at 1.95V vcore LOL. Apparently to take advantage of this beast I'll need to go TEC when i upgrade. I still got air bubbles in the radiator to get rid of.
__________________
http://unoid.net |
|
|
|
|
12-02-2005, 04:47 AM
|
#10 |
|
Cooling Savant

Join Date: Nov 2002
Location: Portugal, Europe
Posts: 870
|
can i suggest some quick disconnects?
easier to move things around.
__________________
"we need more cowbell." |
|
|
|
|
12-03-2005, 02:55 PM
|
#11 |
|
Cooling Neophyte

Join Date: Nov 2000
Location: Arlington, MA, US
Posts: 90
|
That heatercore looks strikingly similiar to one I used in my last external enclosure, way back in the dark ages of 2002. You can see a picture of the one I used here if you're curious.
I would certainly second the motion of adding quick disconnects to the setup. It will make it much easier to work with.
__________________
That which does not kill me had BETTER do enough damage to keep me from firing back! |
|
|
|
|
12-04-2005, 05:16 PM
|
#12 | |
|
Cooling Neophyte
Join Date: Mar 2004
Location: INdiana
Posts: 23
|
Quote:
__________________
http://unoid.net |
|
|
|
|
|
«
Previous Thread
|
Next Thread
»
| Currently Active Users Viewing This Thread: 1 (0 members and 1 guests) | |
|
|

All times are GMT -5. The time now is 05:22 PM.