 | ||
|
||
|
|||||||
| Water Block Design / Construction Building your own block? Need info on designing one? Heres where to do it |
 |
| Thread Tools |
|
|
#101 | |
|
Cooling Savant
Join Date: Jun 2004
Location: Sweden
Posts: 152
|
Quote:
|
|
|
|

|
|
|
#102 |
|
Cooling Neophyte
Join Date: Nov 2004
Location: BULGARIA
Posts: 9
|
CORRECT. But very diffcult . need patience
|
|
|

|
|
|
#103 |
|
Registered User
Join Date: Feb 2003
Location: undergroundcooling.tk
Posts: 15
|
Hello.
Jet style block with universal top. Some pics. The base: 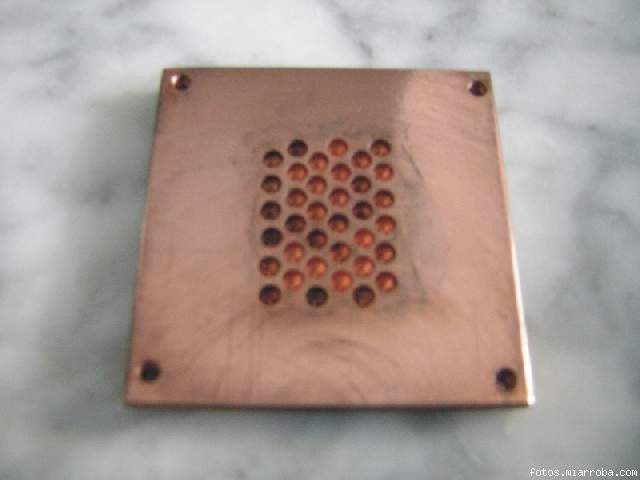 The top plate: 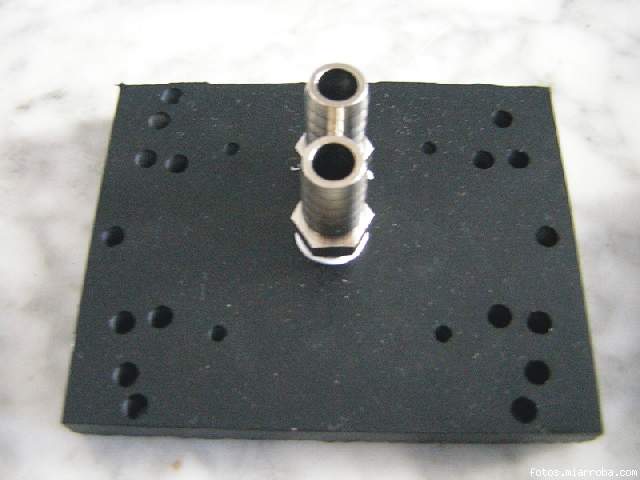 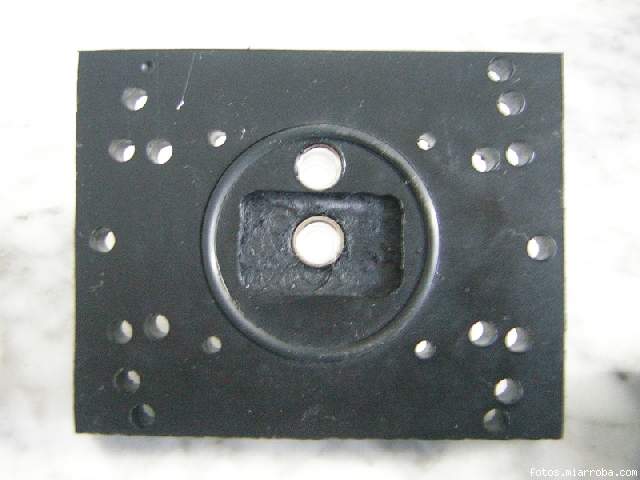 Middle plate:  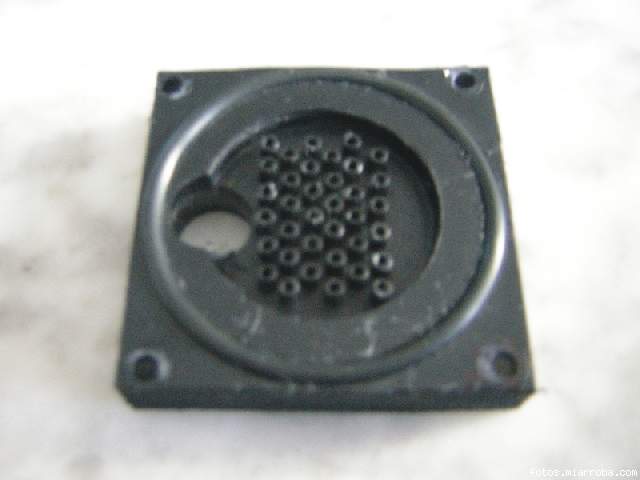 Water in movement: 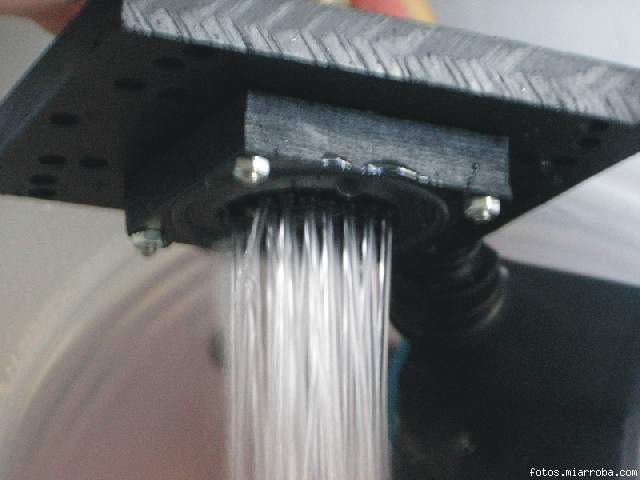 Sorry for the quality of the pics. Thx all. |
|
|

|
|
|
#104 |
|
Registered User
Join Date: Feb 2003
Location: undergroundcooling.tk
Posts: 15
|
Those jets are made of pieces of inox steel tube, and inserted in delrin plate.
Saludos. |
|
|

|
|
|
#105 |
|
Registered User
Join Date: Feb 2003
Location: undergroundcooling.tk
Posts: 15
|
The performance is very good for me. I reached 2600mzh with a Duron 1600 at 38ºC, with 2'325vcore. Actually, I have the Duron clocked at 2400Mhz and 36ºC, at this speed "only" need 1'9vcore.
I buy the inox tubes in a metal store. It's called capillar tubes. They are inserted in the holes with no glue, the pressure is high and they don't move. I make the block in a drill press. To make the O-ring groove, I use a crown blade. Greetings. |
|
|

|
|
|
#106 |
|
Cooling Neophyte
Join Date: Dec 2004
Location: HUN
Posts: 1
|
Hi!!
this was my first block: it's very simple but effective....  what da ya think? Hey pOstman: your're very cool....couldn't you send me a cad file of the top of your block?it would be the sample for my block when i make the bigger1 
|
|
|

|
|
|
#107 |
|
Cooling Neophyte
Join Date: Jul 2004
Location: South Africa
Posts: 69
|
here are some pics of blocks i built when i started WCing my pc, almost a year ago. this project has been drawn out long, but ive learned a lot, and havent had a workspace the whole time.
the HDD waterblock was a nightmare to build, and i eventually broke it cos my template HDD(an old smashed up one) was too small. my gfx card cooler is a disgrace, but i guess im posting it so u guys can have a laugh *g* (couldnt get the stock heatsink off) and it wouldn't be complete without the ghetto ramsinks! my northbridge waterblock... my psu waterblock then my 2nd hard drive waterblock my 2nd cpu waterblock, using the clip from my stock heatsink. my first successful test runs then testing out my passive rad EDIT: incase you're wondering, the 5W pump is in the coffee cup *g* EDIT2: if you're wondering what temps i got, with the bucket, i got decent temps when it was full, cant remember what they were though... the hard drives would sit at a pretty constant 33-35 degrees though, i remember that, so the water must have been a degree or 2 below that. i did try a 15W pump in the bucket, and it affected the cpu temps by only about 3-5 degrees, and it made a noise so i switched to the 5w. i ran a XP1800 there... when i started testing my passive rad(i disconnected the HDDs from the loop for the test and put them on fans), the heat output of the CPU proved too much for the rad... it would idle at about 48-52 degrees. if i loaded the CPU to 100% the temp jumped up quickly by about 4 degrees, and climbed up about 1 degree per minute, when cpu temp hit 60C i got scared and unloaded *g* it was a test, and the test showed that the rad sucked (i had never built a rad before and didnt know what to expect) anyways thats all for now *g* Last edited by LopeDogg; 01-05-2005 at 10:07 AM. |
|
|

|
|
|
#108 |
|
Cooling Neophyte
Join Date: Oct 2004
Location: MA
Posts: 7
|
6800 waterblock
card runs at 480/1250 @42*C (425/1100 @65*C stock) Prescott at 3.6GHz @39*C ( 3.0GHz @ 48*C stock) both are on same loop. 3/8 ID, Eheim1250, Innovatek 120mm rad. w/push-pull fans. The reservoir holds .75L. Total tube length 5.9ft.  6800wb project |
|
|

|
|
|
#109 |
|
Cooling Neophyte
Join Date: Oct 2004
Location: MA
Posts: 7
|
thank you Scorian
this is a quick tour of the build process 6800 waterblock unfortunately those are the only pics i have of this one, but a new model is in the works. Last edited by noxqzs; 01-16-2005 at 01:12 AM. |
|
|

|
|
|
#110 |
|
Cooling Savant
Join Date: Feb 2004
Location: Dunedin NZ
Posts: 735
|
looks fantastic noxqzs, very nice work
Heres my latest creation -well, finished at any rate, i started it probably august last year, about to send it off to a friend at cost (was a prototype block that I didnt need any more) The internals arent neat, and i didnt really get a good shot of them - so im not showing them here 
__________________
Hypocritical Signature I tried to delete: Procooling: where scientific principles are ignored because big corporations are immune to mistakes and oversights. |
|
|

|
|
|
#111 |
|
Cooling Neophyte
Join Date: Aug 2003
Location: Dalian China
Posts: 56
|
my new waterblock
__________________
MSN: watercoolerking@msn.com |
|
|

|
|
|
#112 |
|
Cooling Neophyte
Join Date: Mar 2005
Location: Brazil
Posts: 45
|
    
|
|
|

|
|
|
#113 |
|
Cooling Neophyte
Join Date: May 2004
Location: USA
Posts: 13
|
I just read this entire thread and I really enjoyed it! There are some great designs and pics. The one thing it lacks for the most part is performance information on the different blocks, temps and core/mem/speeds...ect. Hardly anyone posted this. The value of the thread would have been so much higher had this info been included in more posts.
Even then, it's one of the best threads I've seen in a long time. |
|
|

|
|
|
#114 |
|
Cooling Neophyte
Join Date: Mar 2005
Location: Chicago
Posts: 1
|
Here Is my first block. Im a mechanical engineering student and did it for a design project. The base is 1/8" copper with a 1/4" copper centerpiece the base is soldered to the center piece. The top is polycarbonate 3/8" thick. The top is held to the block with 14 screws to provide even force over the entire perimeter of the piece. There are 8 channels that are each 0.1" wide cut into the center piece. The walls are 0.05" thick and are also soldered to the base. The channels provide a 1:4 flow restriction into the block which causes about a 650% increase in velocity in the liquid while it is in the block.
My goal was to create one that kept turbulent flow the entire time so that all of the water was in contact with the copper, not just the water on the outer edges, hence all of the sharp corners. To prevent isolation between the baseplate and the centerpiece they were soldered along the entire contact area. And just for style, my reservoir is a glass window brick. All of the pieces were drawn up in Autocad, and after the final revision, were cut on a waterjet at the university. The tolerances on the machining of this piece were .0005" Doing all of the calculations took roughly 16 or 17 hours, the drawing in autocad about 10 hrs, and the actual machining and assembly about 3 hours. The only issue is that I have no idea how well it actually performs. Like I said, this was for a project for the school, so I haven't put it in yet. The project is an experiment determining the relative effectiveness of several different methods of cooling. 1) OEM Aluminum Heat Sink and Fan 2) Solid Copper Heat Sink and Fan 3) Copper Heat Pipe 4) My Water Cooling System I know that certian ones are better than others, but my question is HOW MUCH better? I should be doing the experiement some time next week, and then I will have actual performance data on the system. |
|
|

|
|
|
#115 |
|
Cooling Savant
Join Date: Apr 2002
Location: North of France
Posts: 198
|
A minichannel WB from my friend Eve, a similar "tree fin" design I never realized because of lack of time. Channel width=~0.2 mm , using wire EDM as usual (like my mini-fins/pins protos if you know). It's just for fun and single model because cost is prohibitive ( >> $800
 ) but very good performer. Full gold anodization to finish and protect it (not shown here) : ) but very good performer. Full gold anodization to finish and protect it (not shown here) :  
|
|
|

|
|
|
#116 |
|
Cooling Savant
Join Date: Apr 2002
Location: North of France
Posts: 198
|
Not a laser (impossible to do such design with a laser). It's EDM (Electro Discharge Machining), a method to destroy/vaporize metal using sparks between a metallic wire and the copper block (no contact between them). The blue ray on the pic is thousands of tiny sparks per second (pulsed high voltage).
It's a very slow process because wire progression is only some millimeters per minute(it depends of metal, thickness, etc.) but it's an ultra precise milling method capable to make <0.05mm channel with a near mirror finish with no difficulty if needed. But long milling time = a lot of $$$ so EDM is never cheap. I found a link for you : http://www.engineersedge.com/edm.shtml (no pics but explanations, try google for more) EDIT : I forgot I had pics of mine with EDM to show you more clearly :  Process is fully done under water to ensure quality of sparks, the pic below is taken in air to have a good view (under water we don't see nothing clear) : 
Last edited by Roscal; 04-13-2005 at 03:06 PM. |
|
|

|
|
|
#117 |
|
Cooling Savant
Join Date: Apr 2002
Location: North of France
Posts: 198
|
Msv > These WBs don't cost anything to us (luckily). All work is possible via good friends relations in industrial world who permit us to realize WB when machines don't work for the firm (during night for EDM automatically). Thanks to them, we can have access to EDM, laser, waterjet, 5 axis CNC and whatever we want for nothing (without abusing obviously). Who want to pay $800 for a WB prototype? Not me
 , it costs a little to the firm only (special wire isn't cheap at all, electricity, etc.). , it costs a little to the firm only (special wire isn't cheap at all, electricity, etc.).IMO, homemade isn't necessary done with a hand saw and drill press only, but I prefer say "not commercial" without restrictions about milling methods. Everyone is free to use what he want and have  . You can do your own EDM machine at home, it's not really difficult if you are a good worker. Try Google, there are examples of home-made EDM machine (to destroy a broken tap in a hole for example). . You can do your own EDM machine at home, it's not really difficult if you are a good worker. Try Google, there are examples of home-made EDM machine (to destroy a broken tap in a hole for example).Satanicoo > My micro-pin version 0.5*0.5 mm at right (best design) just after milling: 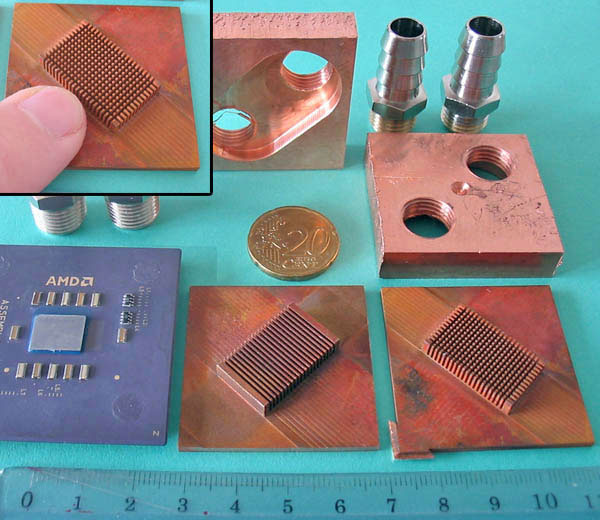
Last edited by Roscal; 04-15-2005 at 10:05 AM. |
|
|

|
|
|
#118 |
|
Cooling Savant
Join Date: Apr 2002
Location: North of France
Posts: 198
|
We can't say that Eve's design have more surface area than a typical fin/pin design because the 2 waterblocks are different. Mine are 40*40*10 mm and Eve are ~55*50*15 mm. In this case, fins areas are near each other. Pressure drop are similar too, designs provide low pressure drop thanks to a lot of channels in parallel. My 0.3 mm fin version have 80% more surface and less pressure drop than 0.5mm version. Testing is the only way to go to compare them on each point. I don't like big WB because they are useless, heavy, take a lot of room, a lot of copper, etc. Small WB designs are more efficient generally (convective coeff in minchannels goes up for example) and it's easy to fit in a case (mine are only 120gr I believe and I could reduce it easily). The design should be always thinked to be the less restrictive and here it's the best design to have that.
 An impingement is possible but my waterblock is too small to fit 3 barbs or 2 with one central, we need a different design. Impimgement isn't the ultimate solution, minichannels are very good without it, too long to explain why. My projects are to make much smaller and thinner WB again without loss of performance (core area is the limit) 
|
|
|

|
|
|
#119 | |
|
Responsible for 2%
of all the posts here. Join Date: May 2002
Location: Texas, U.S.A.
Posts: 8,302
|
Quote:
 After extensive Googling, I came across this site: http://www.edmtt.com/ |
|
|
|

|
|
|
#120 | |
|
Cooling Savant
Join Date: Nov 2002
Location: portugal
Posts: 635
|
Quote:
The best forum for homemade EDM i came across is http://www.cnczone.com/forums/ I am still searching and learning with my little free-time, but what i have seen so far is that building a power supply for an EDM is complicated, has to have detection of colisions, 100 volts for a spark, then a 6ns discharge of 270v, restart the process, etc etc, all this 30.000 time per second on a bad machine! If you find a cheaper way, please tell me!
__________________
back. |
|
|
|

|
|
|
#121 |
|
Cooling Neophyte
Join Date: Apr 2005
Location: Poland
Posts: 1
|
This is my GPU waterblock. Only 15mm
     Rest is on my worklog. Sorry but only in polish language but all is on photo.
__________________
Powered by: - K7D-Master (MS-6501) & 2xAthlon MP 1800+ - 1GB RAM - Gf5200FX 128MB - 560GB harddrive - Tagan 480W WC inside: - 2xColdCrown & Smart for NB - PH802 - Kadet |
|
|

|
|
|
#122 |
|
Cooling Savant
Join Date: Feb 2003
Location: Willmar MN/Fargo ND
Posts: 504
|
Heres a waterblock which I have been running for about 6 months, outperforms all the blocks I have in my possession(about 6c on the maze4)
I have made R1.1 which performed the same in much smaller package, R2 may come soon, I have it designed, but lost some of my passion for making this stuff. Jon |
|
|

|
|
|
#123 |
|
Cooling Savant
Join Date: Feb 2003
Location: Willmar MN/Fargo ND
Posts: 504
|
Some direct peltage
   end mill slipped a little from the collet, milling too fast Just installed it, 36 idle, 42 load on mobile 2400+@2.6ghz 1.85v(older nf7 revision) Jon |
|
|

|
|
|
#124 |
|
Cooling Savant
Join Date: Feb 2004
Location: Dunedin NZ
Posts: 735
|
   Dual blocks for a 3/8ths rig, built for a friend.
__________________
Hypocritical Signature I tried to delete: Procooling: where scientific principles are ignored because big corporations are immune to mistakes and oversights. |
|
|

|
|
|
#125 |
|
Cooling Neophyte
Join Date: May 2005
Location: Californiacation
Posts: 1
|
Before I show my pics, let me just say that everyone else's looks much better than mine, and the only tools I used were a cordless drill, a dremel (only the disk for cutting for a few minutes), and nearly an entire tube of 5 minute epoxy:
   Cost me about $25 total, $13 for the bar (should have bought 1/8" instead of 1/4") As for performance, it cooled an old 1600+ Palonimo around 35-40*C depending on the ambient :shrug: Last edited by Hi8us; 07-26-2005 at 05:22 PM. |
|
|

|
 |
«
Previous Thread
|
Next Thread
»
| Currently Active Users Viewing This Thread: 1 (0 members and 1 guests) | |
|
|
All times are GMT -5. The time now is 07:38 AM.


